Introduction 00:00
Let’s continue our particles series with a classic yet difficult exercise. We are going to morph particles:

There are multiple ways of doing it and we could do it in JS by updating the attribute itself. But as we saw in previous lessons, updating the attribute is bad for performance and it would be impossible to maintain a good frame rate with a large amount of particles.
Another solution is by using GPGPU. It’s a good, but difficult solution which is why we won’t use it. Although it’s not for particle morphing, we’ll learn about GPGPU in one of the next lessons.
Finally, there is an easier solution that relies mostly on the vertex shader, and that we are going to discover now.
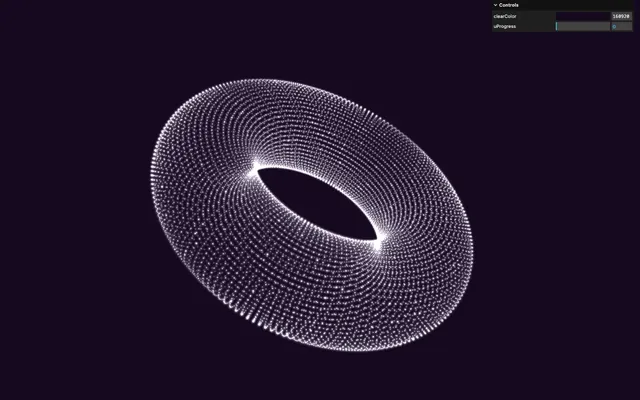
Setup 01:39
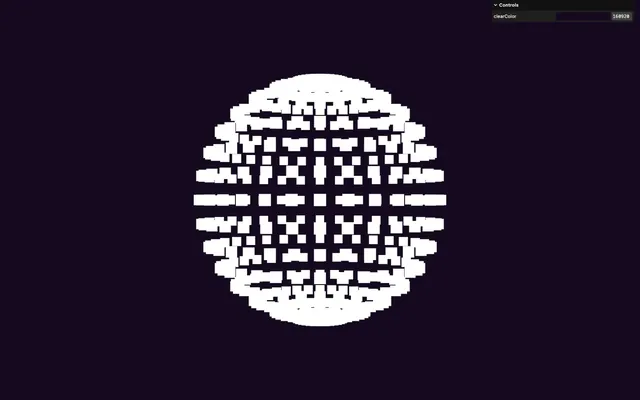
The starter is quite similar to the previous lesson with particles ready to be enhanced:
- A tweakable
clearColor - Some models in one file named
models.glbthat you can find in thestatic/folder (you can download the original Blender file using theResourcesbutton) - A
GLTFLoaderinstance with aDracoLoaderinstance associated with it - A sphere made out of particles using a ShaderMaterial
- The
vite-plugin-glsldependency to handle GLSL files OrbitControlsto rotate aroundgsapin the dependencies
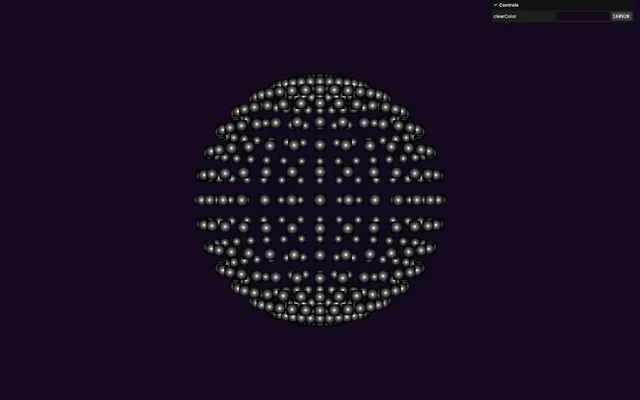
The particle size is already handled in the vertex.glsl. We use a uSize uniform to control it from the JS. Then, perspective is applied and the final size is relative to the height of the render, as seen in previous lessons.
Also, note that everything related to particles has been set as properties of the particles object to keep things organised.
Theory 04:18
The idea is that we are going to send two sets of positions to the vertex shader, one being the initial shape, and another one being the targeted shape. For the initial shape, we can use the classic position attribute. For the targeted shape, we need to send a new attribute. Let’s call it aPositionTarget.
Then, we send a uniform which is going to be a float going from 0 to 1. Let’s name it uProgress. And we are going to use that uProgress to mix between position and aPositionTarget.
Transitioning from one shape to another should be as simple as animating the uProgress.
Obviously, we are going to face difficulties and add cool effects on top of it.
Pattern 06:06
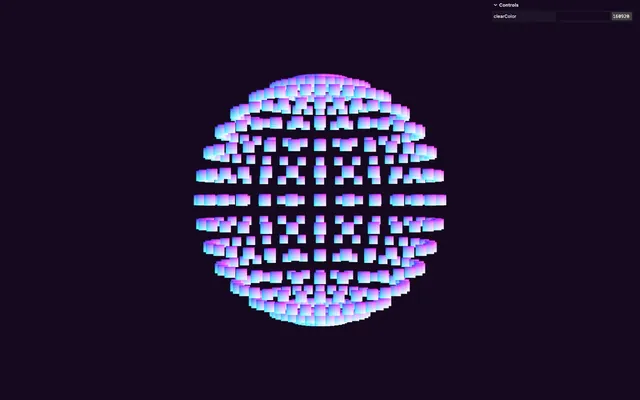
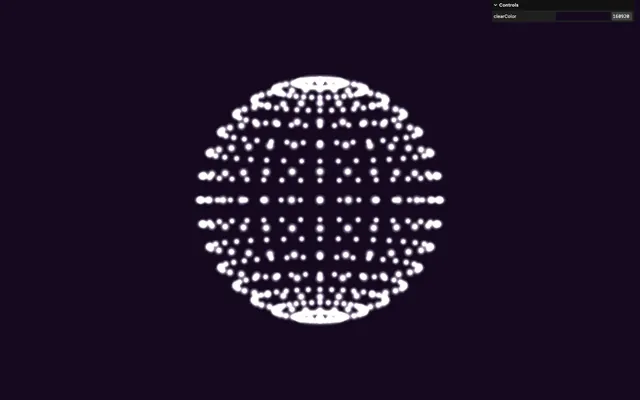
Before tackling the morphing, let’s have some fun and draw a pattern instead of those squares.
We want to draw a bright point at the center of the particle and have that point fade out before it reaches the edges of the particle. We actually did that in the Shader Patterns lesson, but let’s create it from scratch:

In fragment.glsl, retrieve the particle UV using gl_PointCoord, save it as uv and send it to the gl_FragColor to make sure it’s working:
void main()
{
    vec2 uv = gl_PointCoord;

    gl_FragColor = vec4(uv, 1.0, 1.0);
    // ...
}
Next, we need the distance to the center. We are going to use the technique we saw in one of the previous lessons by using the length of the offset uv instead of the distance from vec2(0.5) and send it to gl_FragColor:
void main()
{
    vec2 uv = gl_PointCoord;
    float distanceToCenter = length(uv - 0.5);

    gl_FragColor = vec4(distanceToCenter, distanceToCenter, distanceToCenter, 1.0);
    // ...
}

Using distanceToCenter, we can calculate the alpha.
We want it to be very high at first and plunge very fast. We can use the small number division technique.
The idea is that we take a number below 1 and divide it by an increasing value (distanceToCenter in our case):
Create a float alpha variable, to which you assign 0.05 , divided by distanceToCenter. Send it to gl_FragColor:
void main()
{
    // ...
    float alpha = 0.05 / distanceToCenter;

    gl_FragColor = vec4(alpha, alpha, alpha, 1.0);
    // ...
}
Not bad, but alpha never reaches 0.0 at the edges.
And here comes the trick. Subtract twice the small number you chose from the result:
void main()
{
    // ...
    float alpha = 0.05 / distanceToCenter - 0.1;

    // ...
}
We need to multiply the number by two because the edge of the particle is reached at 0.5, not 1.0, meaning that we need the value to drop twice as fast.
It doesn’t really matter if you don’t understand this formula, as long as you know how to apply it and how it’ll look.
Put back the gl_FragColor to white and use the alpha on the fourth value:
void main()
{
    vec2 uv = gl_PointCoord;
    float distanceToCenter = length(uv - 0.5);
    float alpha = 0.05 / distanceToCenter - 0.1;

    gl_FragColor = vec4(1.0, 1.0, 1.0, alpha);
    #include <tonemapping_fragment>
    #include <colorspace_fragment>
}

It’s not working because we haven’t set the transparent to true on the material, but instead of doing so, we are going to set the blending to AdditiveBlending so that the particles’ brightness merges together:
particles.material = new THREE.ShaderMaterial({
    // ...
    blending: THREE.AdditiveBlending
})
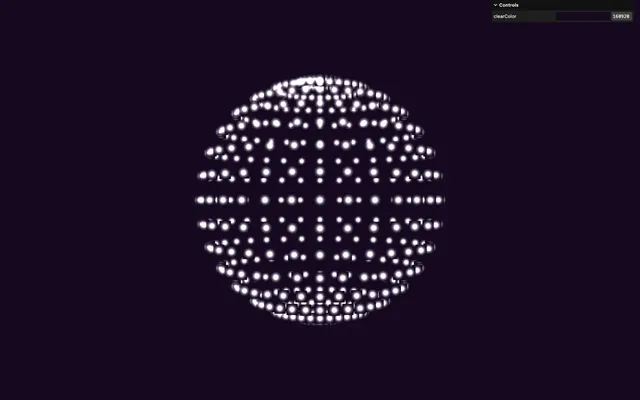
Next, set the depthWrite to false to prevent the occluding issue:
particles.material = new THREE.ShaderMaterial({
    // ...
    depthWrite: false
})
Notice something wrong?
The particles are way too bright, as if there were many of them on top of each other, and that’s exactly what’s going on.
As we’ve seen in previous lessons, whenever Three.js can, it’ll re-use the vertices for multiple triangles using what we call the index.
Even though we are not using triangles since we are drawing particles, WebGL will use the index, resulting in up to 6 particles at the same place in the case of a grid:
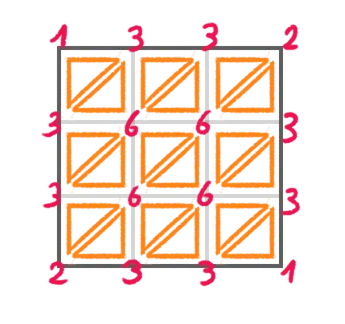
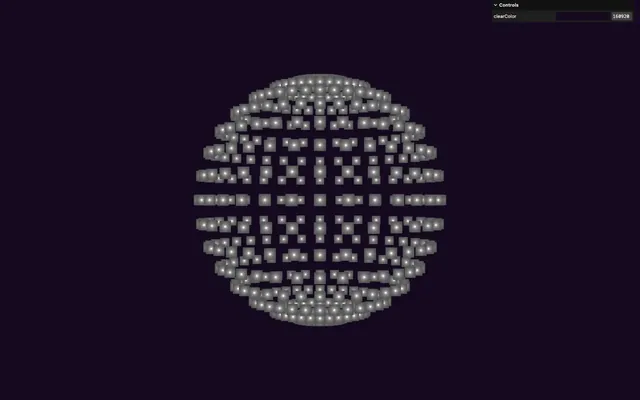
To fix that, remove the index using setIndex(null) on the geometry:
// Geometry
particles.geometry = new THREE.SphereGeometry(3)
particles.geometry.setIndex(null)
This won’t actually be an issue once we use the models, but it was the opportunity to practice.
Load the models 17:56
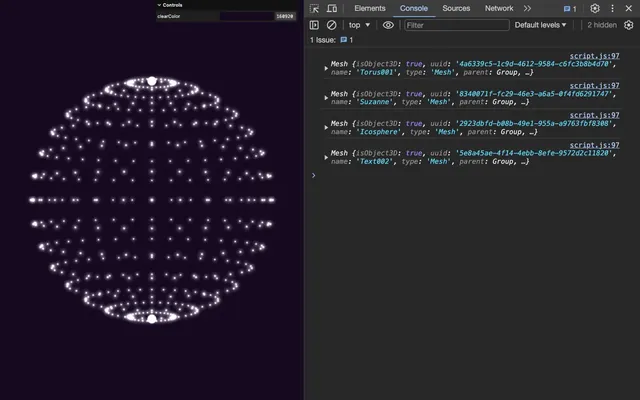
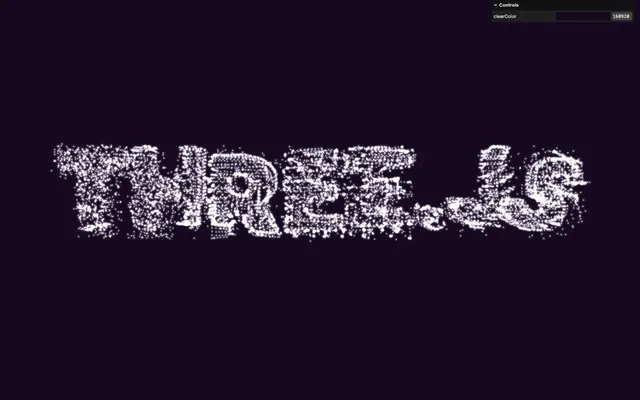
The models we are going to use have been created in Blender.
These consist of a sphere, Suzanne, a text and a torus.
These models have been subdivided to have roughly the same amount of vertices (around 10,000), but none of them has the exact same amount. However, we will deal with this issue later.
The objects have been smoothed. Doing that considerably reduces the amount of data contained in the model because a smoothed geometry results in an indexed geometry, meaning that each vertex is unique.
But didn’t we say that we don’t want the index? Well yes, but we are going to extract the vertices only from the model, not the index, which is why it’s not an issue.
We already have the GLTFLoader instance set with a DRACOLoader instance. Let’s load the models located in static/models.glb:
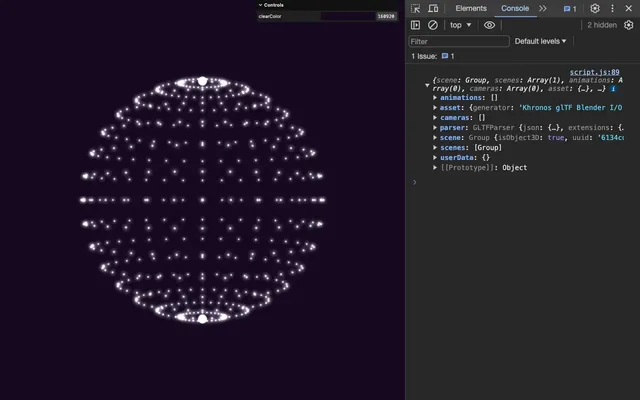
gltfLoader.load('./models.glb', (gltf) =>
{
    console.log(gltf)
})
Since we need the models to create the particles, let’s put all the code related to the particles in the callback function of load():
gltfLoader.load('./models.glb', (gltf) =>
{
    const particles = {}

    // Geometry
    particles.geometry = new THREE.SphereGeometry(3)
    particles.geometry.setIndex(null)

    // Material
    particles.material = new THREE.ShaderMaterial({
        vertexShader: particlesVertexShader,
        fragmentShader: particlesFragmentShader,
        uniforms:
        {
            uSize: new THREE.Uniform(0.4),
            uResolution: new THREE.Uniform(new THREE.Vector2(sizes.width * sizes.pixelRatio, sizes.height * sizes.pixelRatio))
        },
        blending: THREE.AdditiveBlending,
        depthWrite: false
    })

    // Points
    particles.points = new THREE.Points(particles.geometry, particles.material)
    scene.add(particles.points)
})
It seems good, but if you resize the window, you’ll get an error:
That’s because we are updating uResolution in the resize callback, but the particles object is created inside the callback function, thus it only exists in there.
To fix that, we are going to create it outside as null using a let and then update it to an object inside the callback:
let particles = null

gltfLoader.load('./models.glb', (gltf) =>
{
    particles = {}

    // ...
})
We now have access to it outside of the callback, and we can use an if statement to test if there is something in particles before trying to update anything:
window.addEventListener('resize', () =>
{
    // ...

    // Materials
    if(particles)
        particles.material.uniforms.uResolution.value.set(sizes.width * sizes.pixelRatio, sizes.height * sizes.pixelRatio)

    // ...
})
Extract the geometry positions 23:39
Back to our callback function, we want to extract the geometries from the objects in the loaded model. More specifically, we want the position attribute and we can use the map method available on arrays.
The map methods will go through every item of an array and return whatever we return in the function we send to it.
Use the map on gltf.scene.children and send it a function with a child parameter and a console.log() of that child:
gltfLoader.load('./models.glb', (gltf) =>
{
    particles = {}

    // Positions
    gltf.scene.children.map((child) =>
    {
        console.log(child)
    })

    // ...
})
As you can see, the function is being called for every item of the gltf.scene.children array.
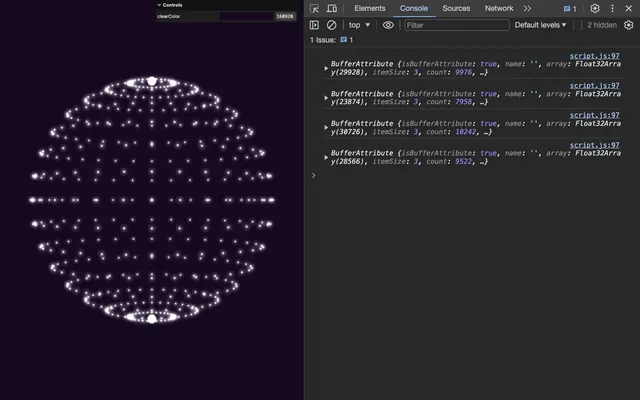
In our case, we want the position attribute and it’s available in the child.geometry.attributes.position property:
gltfLoader.load('./models.glb', (gltf) =>
{
    particles = {}

    // Positions
    gltf.scene.children.map((child) =>
    {
        console.log(child.geometry.attributes.position)
    })

    // ...
})
Now that we found what we wanted, we need to extract each one and save them all.
Assign the result of the map to a positions variable and, instead of doing a console.log(), return the child.geometry.attributes.position:
gltfLoader.load('./models.glb', (gltf) =>
{
    particles = {}

    // Positions
    const positions = gltf.scene.children.map((child) =>
    {
        return child.geometry.attributes.position
    })

    // ...
})
You can console.log(positions) to see what’s inside:
gltfLoader.load('./models.glb', (gltf) =>
{
    particles = {}

    // Positions
    const positions = gltf.scene.children.map((child) =>
    {
        return child.geometry.attributes.position
    })
    console.log(positions)

    // ...
})
We get an array containing all the position attributes extracted from gltf.scene.children.
And since we are using an arrow function, we can write it like this for the same result:
gltfLoader.load('./models.glb', (gltf) =>
{
    particles = {}

    // Positions
    const positions = gltf.scene.children.map(child => child.geometry.attributes.position)

    // ...
})
Harmonise the positions 28:42
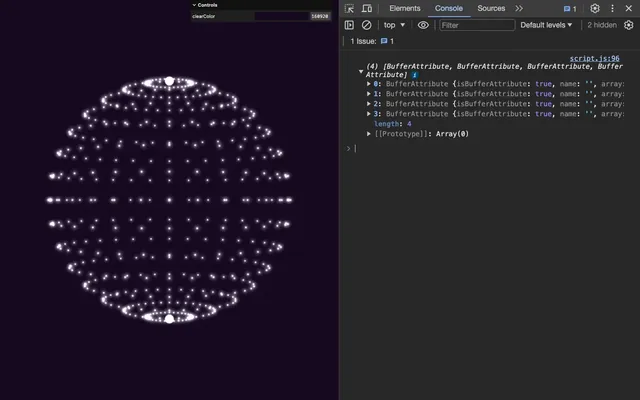
The positions array contains the vertices of the 4 objects, but none of them have the exact same size.
We need to harmonise them, and we are going to add values to the smallest ones so that they are all the size of the biggest one.
First, we need to establish the maximum count of vertices.
Create a maxCount property and set it to 0:
gltfLoader.load('./models.glb', (gltf) =>
{
    particles = {}

    // Positions
    const positions = gltf.scene.children.map(child => child.geometry.attributes.position)

    particles.maxCount = 0

    // ...
})
Loop through the positions array using a for(… of …), compare the number of vertices using the count property, and if it’s bigger than particles.maxCount, update particles.maxCount accordingly:
gltfLoader.load('./models.glb', (gltf) =>
{
    particles = {}

    // Positions
    const positions = gltf.scene.children.map(child => child.geometry.attributes.position)

    particles.maxCount = 0
    for(const position of positions)
    {
        if(position.count > particles.maxCount)
            particles.maxCount = position.count
    }

    // ...
})
Now that we know what the max size of the positions is, we need to update them. But remember that attributes are made out of Float32Array and this type of array can’t have its length changed.
We need to create a brand-new Float32Array with the right size.
After calculating the maxCount, create an empty array particles.position and loop through the positions again:
gltfLoader.load('./models.glb', (gltf) =>
{
    particles = {}

    // Positions
    // ...

    particles.positions = []
    for(const position of positions)
    {
    }

    // ...
}
particles.positions will contain all 4 new positions attributes:
Be very careful of the order you do things. Yes, we are doing a for(… of …) on positions again, but it has to be a separate one because we need to calculate the maxCount first.
Retrieve the original array of vertices out of the position and save it as originalArray:
gltfLoader.load('./models.glb', (gltf) =>
{
    // ...
    for(const position of positions)
    {
        const originalArray = position.array
    }

    // ...
}
Create a Float32Array the size of maxCount multiplied by 3 (because x, y and z) and save it as newArray:
gltfLoader.load('./models.glb', (gltf) =>
{
    // ...
    for(const position of positions)
    {
        const originalArray = position.array
        const newArray = new Float32Array(particles.maxCount * 3)
    }

    // ...
}
As always, we are being very explicit in the way we code. We could have done it very differently, but it’s important to keep things clear while we learn.
Still in the for(… of …), loop from 0 to particles.maxCount, use a classic for() and create an i3 variable equal to i * 3:
gltfLoader.load('./models.glb', (gltf) =>
{
    // ...
    for(const position of positions)
    {
        const originalArray = position.array
        const newArray = new Float32Array(particles.maxCount * 3)

        for(let i = 0; i < particles.maxCount; i++)
        {
            const i3 = i * 3
        }
    }

    // ...
}
We are ready to fill the array. We have the original vertices in originalArray and we need to fill the newArray.
In the for(), as long as i3 is less than originalArray.length, take the values from originalArray and put them in newArray:
gltfLoader.load('./models.glb', (gltf) =>
{
    // ...
    for(const position of positions)
    {
        const originalArray = position.array
        const newArray = new Float32Array(particles.maxCount * 3)

        for(let i = 0; i < particles.maxCount; i++)
        {
            const i3 = i * 3

            if(i3 < originalArray.length)
            {
                newArray[i3 + 0] = originalArray[i3 + 0]
                newArray[i3 + 1] = originalArray[i3 + 1]
                newArray[i3 + 2] = originalArray[i3 + 2]
            }
        }
    }

    // ...
}
Otherwise, we fill the array with a bunch of 0:
gltfLoader.load('./models.glb', (gltf) =>
{
    // ...
    for(const position of positions)
    {
        const originalArray = position.array
        const newArray = new Float32Array(particles.maxCount * 3)

        for(let i = 0; i < particles.maxCount; i++)
        {
            const i3 = i * 3

            if(i3 < originalArray.length)
            {
                newArray[i3 + 0] = originalArray[i3 + 0]
                newArray[i3 + 1] = originalArray[i3 + 1]
                newArray[i3 + 2] = originalArray[i3 + 2]
            }
            else
            {
                newArray[i3 + 0] = 0
                newArray[i3 + 1] = 0
                newArray[i3 + 2] = 0
            }
        }
    }

    // ...
}
Later, we will pick random values from the originalArray, but we have been coding without seeing anything for a while, so let’s keep things simple.
Still in the for(… of …) loop (not the classic for()), create a Float32BufferAttribute using the newArray, set the itemSize to 3 and push() it in the particles.positions array:
gltfLoader.load('./models.glb', (gltf) =>
{
    // ...
    for(const position of positions)
    {
        // ...

        particles.positions.push(new THREE.Float32BufferAttribute(newArray, 3))
    }

    // ...
}
You can console.log(particles.positions) to check if all the arrays have the same size and are filled with 0 at the end (except the biggest one):
gltfLoader.load('./models.glb', (gltf) =>
{
    // ...
    for(const position of positions)
    {
        // ...
    }

    console.log(particles.positions)

    // ...
}
We have been coding for a while without seeing anything. Fortunately, we can finally test our arrays.
On the Geometry part, instead of the SphereGeometry, create a BufferGeometry:
gltfLoader.load('./models.glb', (gltf) =>
{
    // ...

    // Geometry
    particles.geometry = new THREE.BufferGeometry()

    // ...
})

We get nothing because the geometry is empty.
Set a 'position' attribute using the setAttribute() method and use any of particles.positions we prepared. I’ll be using Suzanne (particles.positions[1]):
gltfLoader.load('./models.glb', (gltf) =>
{
    // ...

    // Geometry
    particles.geometry = new THREE.BufferGeometry()
    particles.geometry.setAttribute('position', particles.positions[1])

    // ...
})
It’s finally working.
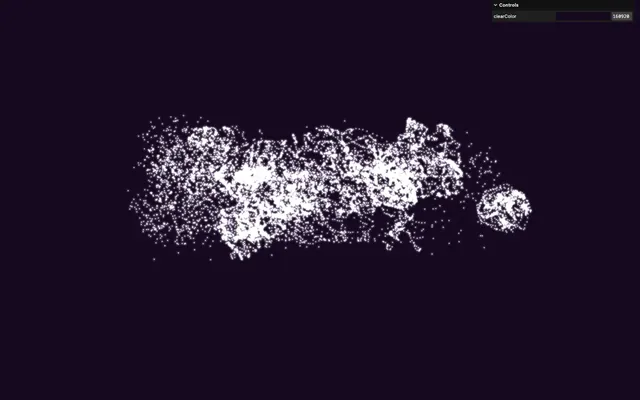
As mentioned earlier, we don’t need the setIndex(null) anymore because the vertices are unique and the BufferGeometry doesn’t have an index by default.
If you rotate around, you’ll notice the big point at the center:
This point is made up of all the vertices we’ve added to fill the array with their position to 0, 0, 0.
Back to the for() where we filled the arrays: instead of setting the filling value to 0, we are going to pick a random vertex from the originalArray.
First, create a randomIndex variable which is going to be the position.count multiplied by Math.random(), floored with Math.floor() so that we get random indexes of the originalArray:
gltfLoader.load('./models.glb', (gltf) =>
{
    // ...
    for(const position of positions)
    {
        // ...

        for(let i = 0; i < particles.maxCount; i++)
        {
            // ...
            else
            {
                const randomIndex = Math.floor(position.count * Math.random())
                newArray[i3 + 0] = 0
                newArray[i3 + 1] = 0
                newArray[i3 + 2] = 0
            }
        }
    }

    // ...
}
We also need to multiply it by 3 because values go 3 by 3 in originalArray (x, y and z):
gltfLoader.load('./models.glb', (gltf) =>
{
    // ...
    for(const position of positions)
    {
        // ...

        for(let i = 0; i < particles.maxCount; i++)
        {
            // ...
            else
            {
                const randomIndex = Math.floor(position.count * Math.random()) * 3
                newArray[i3 + 0] = 0
                newArray[i3 + 1] = 0
                newArray[i3 + 2] = 0
            }
        }
    }

    // ...
}
Now pick values from originalArray using the randomIndex:
gltfLoader.load('./models.glb', (gltf) =>
{
// ...
for(const position of positions)
{
// ...
for(let i = 0; i < particles.maxCount; i++)
{
// ...
else
{
const randomIndex = Math.floor(position.count * Math.random()) * 3
newArray[i3 + 0] = originalArray[randomIndex + 0]
newArray[i3 + 1] = originalArray[randomIndex + 1]
newArray[i3 + 2] = originalArray[randomIndex + 2]
}
}
}
// ...
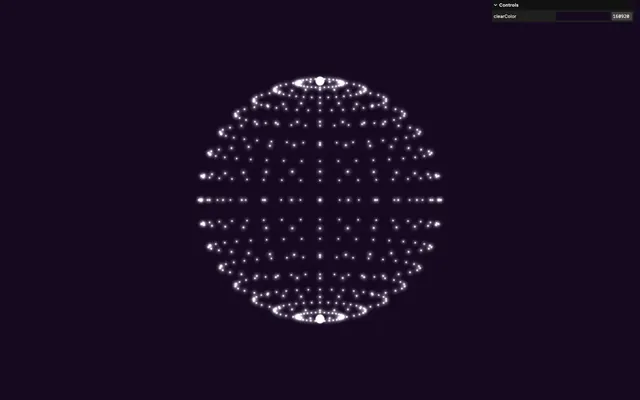
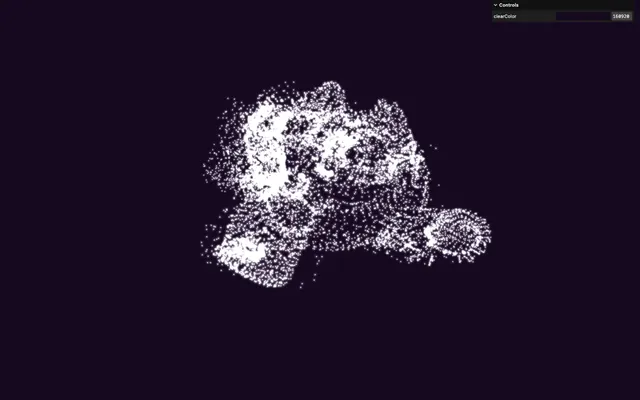
}Now, the particles in the middle are gone and filled vertices are taken randomly from the originalArray. Some particles look brighter and that’s because there are multiple ones there, which, this time, is on purpose.
As always, there are shorter ways of writing everything we did, but we want to keep things as simple and easy as possible.
Let’s make the particles slightly smaller so that we can appreciate the following part.
gltfLoader.load('./models.glb', (gltf) =>
{
    // ...
    particles.material = new THREE.ShaderMaterial({
        // ...
        uniforms:
        {
            uSize: new THREE.Uniform(0.2),
            // ...
        },
        // ...
    })

    // ...
})

Mix positions 45:35
Let’s start the fun part and get the particles moving from one shape to the other.
To do that, we need to have both positions available in the shader.
Add an 'aPositionTarget' like we added the 'position', but use a different item from particles.positions (try with particles.positions[3]):
gltfLoader.load('./models.glb', (gltf) =>
{
    // ...

    // Geometry
    particles.geometry = new THREE.BufferGeometry()
    particles.geometry.setAttribute('position', particles.positions[1])
    particles.geometry.setAttribute('aPositionTarget', particles.positions[3])

    // ...
})
Unlike the position attribute, we need to retrieve it manually in the vertex.glsl:
attribute vec3 aPositionTarget;At the beginning of main(), create a float progress variable set to 0.5 and a vec3 mixedPosition variable mixing between the position and the aPositionTarget according to progress:
void main()
{
    // Mixed position
    float progress = 0.5;
    vec3 mixedPosition = mix(position, aPositionTarget, progress);

    // ...
}
Send the mixedPosition to the modelPosition instead of position:
void main()
{
    // ...

    // Final position
    vec4 modelPosition = modelMatrix * vec4(mixedPosition, 1.0);
    // ...
}
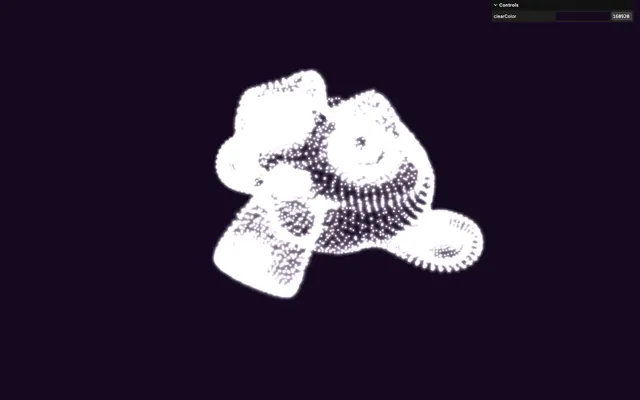
What you see is a perfect mix between Suzanne and the THREE.JS text.
Test different progress values and you’ll understand.
Consider the result of setting progress to 0.1:
void main()
{
    float progress = 0.1;
    // ...
}
Now change progress to 0.9:
void main()
{
    float progress = 0.9;
    // ...
}
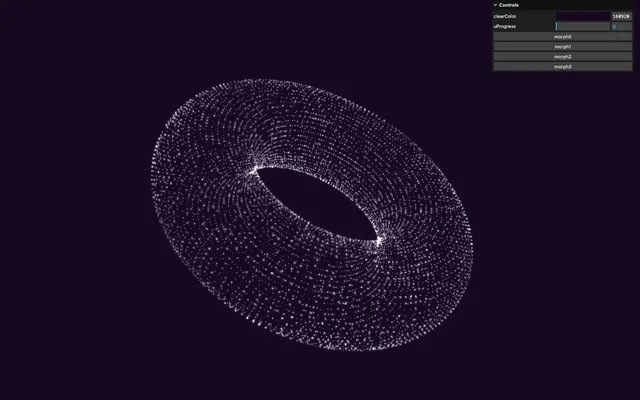
Uniform
That’s great, but if we have to change the progress manually, we won’t get very far.
We are going to use a uniform and animate that uniform from the JS.
Create a uProgress uniform using the Uniform class and set it to 0:
gltfLoader.load('./models.glb', (gltf) =>
{
    // ...

    particles.material = new THREE.ShaderMaterial({
        // ...
        uniforms:
        {
            // ...
            uProgress: new THREE.Uniform(0)
        },
        // ...
    })

    // ...
})
Retrieve it in vertex.glsl and assign it to progress:
// ...
uniform float uProgress;

// ...

void main()
{
    // Mixed position
    float progress = uProgress;
    // ...
}
We get Suzanne because uProgress is at 0.
At the end, uProgress will be animated, but let’s have some fun and add a tweak for it:
gltfLoader.load('./models.glb', (gltf) =>
{
// ...
// Tweaks
gui.add(particles.material.uniforms.uProgress, 'value').min(0).max(1).step(0.001).name('uProgress')
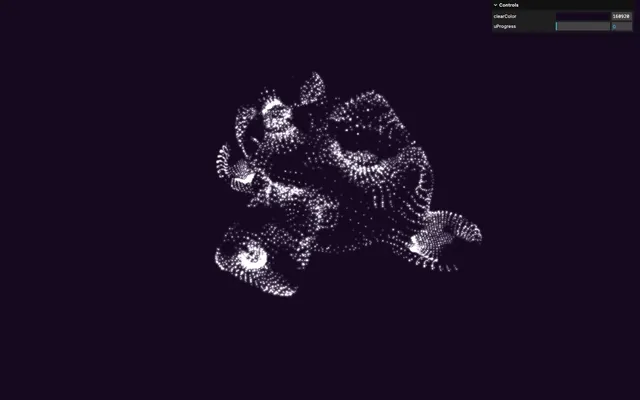
})Better transition 51:08
Our transition is working but all the particles are starting at the same time, go to their destination at a linear speed and arrive at the same time. Lame.
To fix that, we are going to make them start at a different time and, in the process, make the animation start slowly, accelerate in the middle and slow down when arriving.
To control the delay before they start, we are going to use a Perlin Noise so that it feels like pieces of the models are separating.
Actually, this time, we are going to use the Simplex Noise instead of the Perlin Noise. It’s very similar, although it looks more natural, less grid-ish, it’s more performant (especially at higher dimensions). It’s also written by Ken Perlin.
You can find it on the same Gist we used before: https://gist.github.com/patriciogonzalezvivo/670c22f3966e662d2f83
Here is a slightly reformatted version:
//	Simplex 3D Noise
//	by Ian McEwan, Ashima Arts
//
vec4 permute(vec4 x){ return mod(((x*34.0)+1.0)*x, 289.0); }
vec4 taylorInvSqrt(vec4 r){ return 1.79284291400159 - 0.85373472095314 * r; }

float simplexNoise3d(vec3 v)
{
    const vec2  C = vec2(1.0/6.0, 1.0/3.0) ;
    const vec4  D = vec4(0.0, 0.5, 1.0, 2.0);

    // First corner
    vec3 i  = floor(v + dot(v, C.yyy) );
    vec3 x0 =   v - i + dot(i, C.xxx) ;

    // Other corners
    vec3 g = step(x0.yzx, x0.xyz);
    vec3 l = 1.0 - g;
    vec3 i1 = min( g.xyz, l.zxy );
    vec3 i2 = max( g.xyz, l.zxy );

    //  x0 = x0 - 0. + 0.0 * C
    vec3 x1 = x0 - i1 + 1.0 * C.xxx;
    vec3 x2 = x0 - i2 + 2.0 * C.xxx;
    vec3 x3 = x0 - 1. + 3.0 * C.xxx;

    // Permutations
    i = mod(i, 289.0 );
    vec4 p = permute( permute( permute( i.z + vec4(0.0, i1.z, i2.z, 1.0 )) + i.y + vec4(0.0, i1.y, i2.y, 1.0 ))  + i.x + vec4(0.0, i1.x, i2.x, 1.0 ));

    // Gradients
    // ( N*N points uniformly over a square, mapped onto an octahedron.)
    float n_ = 1.0/7.0; // N=7
    vec3  ns = n_ * D.wyz - D.xzx;

    vec4 j = p - 49.0 * floor(p * ns.z *ns.z);  //  mod(p,N*N)

    vec4 x_ = floor(j * ns.z);
    vec4 y_ = floor(j - 7.0 * x_ );    // mod(j,N)

    vec4 x = x_ *ns.x + ns.yyyy;
    vec4 y = y_ *ns.x + ns.yyyy;
    vec4 h = 1.0 - abs(x) - abs(y);

    vec4 b0 = vec4( x.xy, y.xy );
    vec4 b1 = vec4( x.zw, y.zw );

    vec4 s0 = floor(b0)*2.0 + 1.0;
    vec4 s1 = floor(b1)*2.0 + 1.0;
    vec4 sh = -step(h, vec4(0.0));

    vec4 a0 = b0.xzyw + s0.xzyw*sh.xxyy ;
    vec4 a1 = b1.xzyw + s1.xzyw*sh.zzww ;

    vec3 p0 = vec3(a0.xy,h.x);
    vec3 p1 = vec3(a0.zw,h.y);
    vec3 p2 = vec3(a1.xy,h.z);
    vec3 p3 = vec3(a1.zw,h.w);

    // Normalise gradients
    vec4 norm = taylorInvSqrt(vec4(dot(p0,p0), dot(p1,p1), dot(p2, p2), dot(p3,p3)));
    p0 *= norm.x;
    p1 *= norm.y;
    p2 *= norm.z;
    p3 *= norm.w;

    // Mix final noise value
    vec4 m = max(0.6 - vec4(dot(x0,x0), dot(x1,x1), dot(x2,x2), dot(x3,x3)), 0.0);
    m = m * m;
    return 42.0 * dot( m*m, vec4( dot(p0,x0), dot(p1,x1), dot(p2,x2), dot(p3,x3) ) );
}
In src/shaders/, create an includes/ folder. In that folder, create a simplexNoise3d.glsl file and put the above code in it.
Back to the vertex.glsl file, include ../includes/simplexNoise3d.glsl, call a simplexNoise3d() using the position and save it in a float noise variable:
#include ../includes/simplexNoise3d.glsl

void main()
{
    // Mixed position
    float noise =  simplexNoise3d(position);
    float progress = uProgress;
    // ...
}
Before doing some math sorcery, let’s see what this noise looks like.
Create a vColor varying, to which you assign the noise as a vec3():
// ...

varying vec3 vColor;

// ...

void main()
{
    // ...

    // Varyings
    vColor = vec3(noise);
}
In fragment.glsl, retrieve the vColor varying and send it to the gl_FragColor:
varying vec3 vColor;

void main()
{
    // ...

    gl_FragColor = vec4(vColor, alpha);
    // ...
}
It looks okay, but the parts in the dark indicate that some chunks are below 0.0. The Simplex Noise ranges from -1 to +1. We would prefer values from 0 to 1 and we want to be sure the value is clamped in that range. It’s also the opportunity to smooth the value.
We are going to use the classic smoothstep.
Back to vertex.glsl, apply a smoothstep on noise from -1 to 1:
void main()
{
    // Mixed position
    float noise = simplexNoise3d(position);
    noise = smoothstep(-1.0, 1.0, noise);

    float progress = uProgress;
    // ...
}
That’s better. Let’s keep the vColor, it’ll come in handy a bit later.
We now want to offset the progress according to that noise. But we also need all the particles to be at 1.0 when uProgress arrives at 1.0.
Things are getting a little bit complicated.
In order to understand what’s going on, here is a sample of 8 particles.
The green line indicates the progress from 0 to 1:
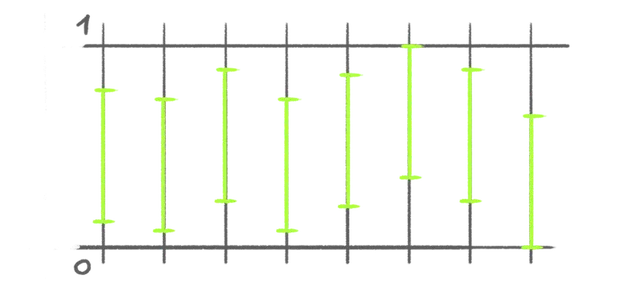
As you can see, all the green lines have the same length which is 0.6:
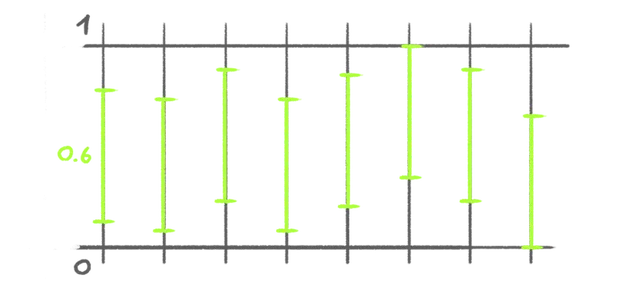
This means they all take as much time to finish their animation. Let’s call this the duration.
But they start at a different moments. Let’s call this the delay.
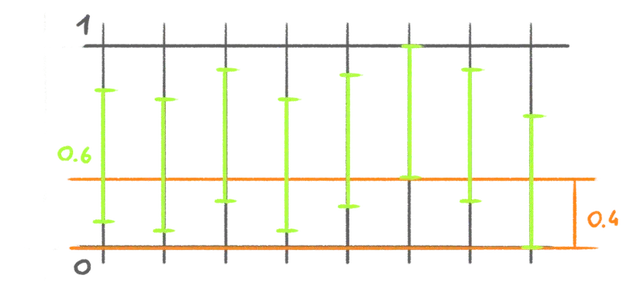
Since all the particles duration is 0.6, it means that the delay needs to be between 0 and 0.4 so that none of them finishes after 1. We can calculate the maximum delay with 1.0 - duration.
And the delay will be multiplied by the noise:
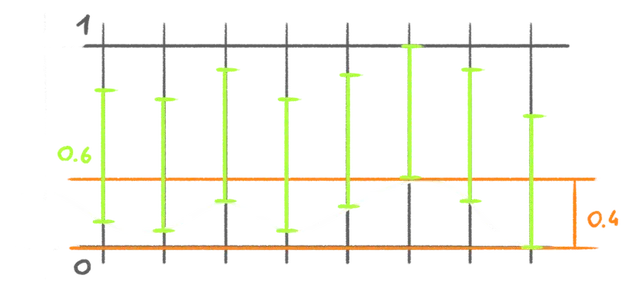
I’m going to spoil you and tell you that we are going to use a smootshtep again, which means we need to know the bottom limit and the top limit.
The bottom limit is delay, and we have to calculate the top limit which we are going to call end.
Since we know when it starts with delay and how long it takes with duration, end can be calculated as the delay + duration:
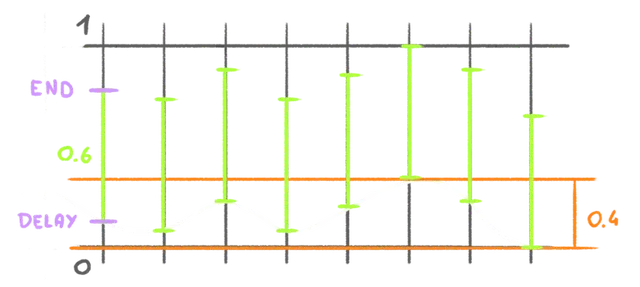
We have everything we need.
In vertex.glsl, before the progress:
- Create a
float durationequal to0.4 - Create a
float delayequal to(1.0 - duration) * noise - Create a
float endequal todelay + duration
void main()
{
    // ...

    float duration = 0.4;
    float delay = (1.0 - duration) * noise;
    float end = delay + duration;
    float progress = uProgress;

    // ...
}
We can now apply a smoothstep on the uProgress and have the delay and the end as the limits:
void main()
{
    // ...

    float duration = 0.4;
    float delay = (1.0 - duration) * noise;
    float end = delay + duration;
    float progress = smoothstep(delay, end, uProgress);

    // ...
}
It’s working, but only for the beginning animation. The reason is that we are using the position in the simplexNoise3d() and this position corresponds to the initial shape, not the targeted shape.
To fix that, we are going to calculate a second Simplex Perlin using the aPositionTarget and mix between the two according to the uProgress.
Rename the first noise to noiseOrigin:
void main()
{
    // Mixed position
    float noiseOrigin = simplexNoise3d(position);
    // ...
}
Create a new one named noiseTarget and use aPositionTarget for the simplexNoise3d():
void main()
{
    // Mixed position
    float noiseOrigin = simplexNoise3d(position);
    float noiseTarget = simplexNoise3d(aPositionTarget);
    // ...
}
Create the final one named noise by mixing between noiseOrigin and noiseTarget according to uProgress and keep the smoothstep on top of it:
void main()
{
    // Mixed position
    float noiseOrigin = simplexNoise3d(position);
    float noiseTarget = simplexNoise3d(aPositionTarget);
    float noise = mix(noiseOrigin, noiseTarget, uProgress);
    noise = smoothstep(-1.0, 1.0, noise);

    // ...
}
The frequency of the Simplex Noise is a bit too high. Multiply it in both simplexNoise3d() by 0.2:
void main()
{
    // Mixed position
    float noiseOrigin = simplexNoise3d(position * 0.2);
    float noiseTarget = simplexNoise3d(aPositionTarget * 0.2);

    // ...
}
Animate the progress 01:08:44
Back to the JS, we now want to trigger the animation using buttons.
We are going to have 4 buttons in the debug panel, one for each shape, and clicking on any of them will transition the particles to the corresponding shape.
Switching the particles to a different shape requires 3 things:
- Set the
positionattribute to the original geometry - Set the
aPositionTargetattribute to the targeted geometry - Animate
uProgressfrom0to1
We also need to save the current index so that we know from what geometry we are supposed to transition the next time.
Let’s start by setting an index property on the particles object:
gltfLoader.load('./models.glb', (gltf) =>
{
    particles = {}
    particles.index = 0

    // ...
})
We can use particles.index on the initial position attribute:
gltfLoader.load('./models.glb', (gltf) =>
{
    particles = {}
    particles.index = 0

    // ...
    particles.geometry.setAttribute('position', particles.positions[particles.index])
})
In order to automatise the transition to a different geometry, let’s create a morph method on particles right before the tweaks:
gltfLoader.load('./models.glb', (gltf) =>
{
    // ...

    // Methods
    particles.morph = () =>
    {
    }

    // Tweaks
    // ...
})
Add an index parameter to the morph method:
gltfLoader.load('./models.glb', (gltf) =>
{
    // ...

    // Methods
    particles.morph = (index) =>
    {
    }

    // ...
})
In the morph method, we can now do everything we said earlier.
Set the position attribute to the original geometry and set the aPositionTarget attribute to the targeted geometry:
gltfLoader.load('./models.glb', (gltf) =>
{
    // ...

    // Methods
    particles.morph = (index) =>
    {
        // Update attributes
        particles.geometry.attributes.position = particles.positions[particles.index]
        particles.geometry.attributes.aPositionTarget = particles.positions[index]
    }

    // ...
})
Animate the uProgress uniform from 0 to 1 using gsap.fromTo():
gltfLoader.load('./models.glb', (gltf) =>
{
    // ...

    // Methods
    particles.morph = (index) =>
    {
        // ...

        // Animate uProgress
        gsap.fromTo(
            particles.material.uniforms.uProgress,
            { value: 0 },
            { value: 1 }
        )
    }

    // ...
})
We don’t use gsap.to(), because we need it to start from 0 before going to 1.
Set the duration to 3 and the ease to 'linear' because we’re already applying an easing on the progress in the vertex shader thanks to smoothsteps:
gltfLoader.load('./models.glb', (gltf) =>
{
    // ...

    // Methods
    particles.morph = (index) =>
    {
        // ...

        // Animate uProgress
        gsap.fromTo(
            particles.material.uniforms.uProgress,
            { value: 0 },
            { value: 1, duration: 3, ease: 'linear' }
        )
    }

    // ...
})
Replace particles.index by index so that the next call to morph will consider the new shape as the old one:
gltfLoader.load('./models.glb', (gltf) =>
{
    // ...

    // Methods
    particles.morph = (index) =>
    {
        // ...

        // Save index
        particles.index = index
    }

    // ...
})
We now need to call the morph method with 0, 1, 2 or 3 according to the button pressed.
Unfortunately, we can’t send functions with parameters to lil-gui. To fix that we are going to create 4 functions, and each one calls morph with the corresponding index:
gltfLoader.load('./models.glb', (gltf) =>
{
    // ...

    particles.morph0 = () => { particles.morph(0) }
    particles.morph1 = () => { particles.morph(1) }
    particles.morph2 = () => { particles.morph(2) }
    particles.morph3 = () => { particles.morph(3) }
})
Add those methods to gui:
gltfLoader.load('./models.glb', (gltf) =>
{
// ...
gui.add(particles, 'morph0')
gui.add(particles, 'morph1')
gui.add(particles, 'morph2')
gui.add(particles, 'morph3')
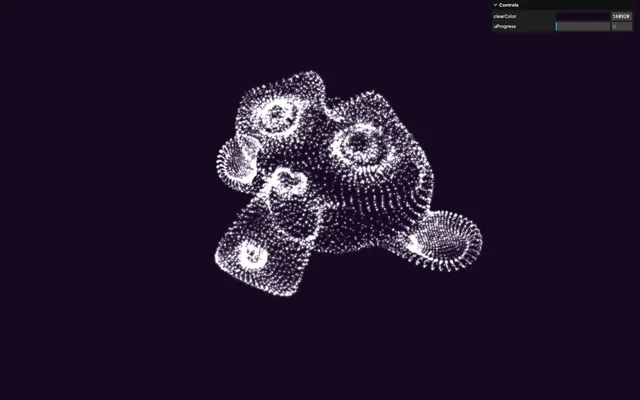
})We have our animated morphing particles and can switch between them with simple buttons.
By the way, we can ask the tweak for the uProgress to update itself when the value is being animated using the listen() method:
gltfLoader.load('./models.glb', (gltf) =>
{
// ...
gui.add(particles.material.uniforms.uProgress, 'value').min(0).max(1).step(0.001).name('uProgress').listen()
// ...
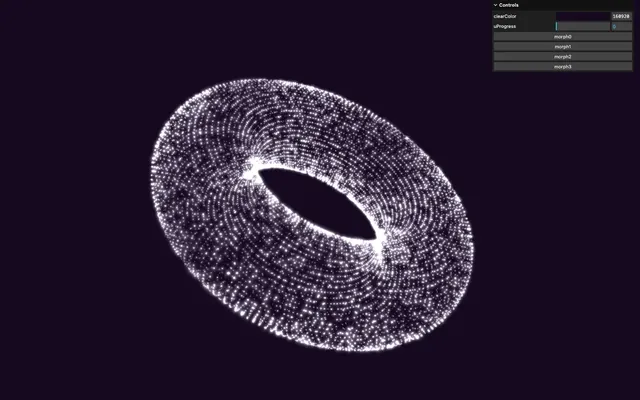
})Random size 01:17:52
Let’s go a little further and make our particles look good.
First, let’s add some more randomness by assigning different sizes to each particle.
In script.js, at the Geometry part, create a Float32Array the size of particles.maxCount and save it as sizesArray:
gltfLoader.load('./models.glb', (gltf) =>
{
    // ...

    // Geometry
    const sizesArray = new Float32Array(particles.maxCount)

    // ...
})
Fill it with random values:
gltfLoader.load('./models.glb', (gltf) =>
{
    // ...

    // Geometry
    const sizesArray = new Float32Array(particles.maxCount)

    for(let i = 0; i < particles.maxCount; i++)
	    sizesArray[i] = Math.random()

    // ...
})
Send it to the geometry as aSize with the other attributes:
gltfLoader.load('./models.glb', (gltf) =>
{
    // ...

    // Geometry
    particles.geometry.setAttribute('position', particles.positions[particles.index])
    particles.geometry.setAttribute('aPositionTarget', particles.positions[3])
    particles.geometry.setAttribute('aSize', new THREE.BufferAttribute(sizesArray, 1))

    // ...
})
In vertex.glsl, retrieve the aSize attribute and multiply the gl_PointSize by it:
// ...
attribute float aSize;

// ...

void main()
{
    // ...
    gl_PointSize = aSize * uSize * uResolution.y;
    // ...
}
Now would be a good time to make all the particles bigger.
Set the uSize uniform to 0.4:
gltfLoader.load('./models.glb', (gltf) =>
{
    // ...
    particles.material = new THREE.ShaderMaterial({
        // ...
        uniforms:
        {
            uSize: new THREE.Uniform(0.4),
            // ...
        },
        // ...
    })

    // ...
})
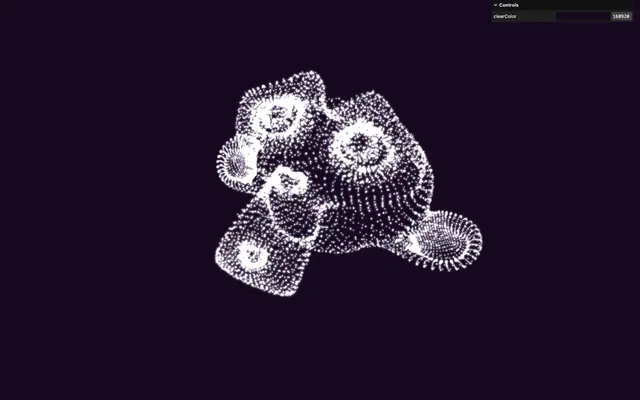
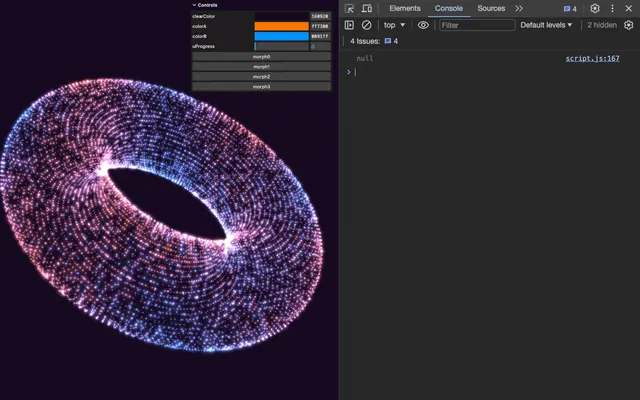
Color gradient 01:20:59
One final visual improvement we are going to add is the color.
Currently, we are sending the perlin as vColor to the fragment which is why we get white variations only.
We are going to mix between two colors and use the perlin as the mix factor.
In script.js, in the Material part, add two colors to particles:
gltfLoader.load('./models.glb', (gltf) =>
{
    // ...

    // Material
    particles.colorA = '#ff7300'
    particles.colorB = '#0091ff'

    // ...
})
Send those colors to a uColorA and uColorB uniforms using the Uniform class and the Color class:
gltfLoader.load('./models.glb', (gltf) =>
{
    // ...

		particles.material = new THREE.ShaderMaterial({
        // ...
        uniforms:
        {
            // ...
            uColorA: new THREE.Uniform(new THREE.Color(particles.colorA)),
            uColorB: new THREE.Uniform(new THREE.Color(particles.colorB))
        },
        // ...
    })

    // ...
})
Add tweaks for particles.colorA and particles.colorB, and update the uniforms accordingly when the tweak changes:
gltfLoader.load('./models.glb', (gltf) =>
{
    // ...

    // Tweak
    gui.addColor(particles, 'colorA').onChange(() => { particles.material.uniforms.uColorA.value.set(particles.colorA) })
    gui.addColor(particles, 'colorB').onChange(() => { particles.material.uniforms.uColorB.value.set(particles.colorB) })

    // ...
})
In vertex.glsl, retrieve the uColorA and uColorB as vec3 uniforms:
uniform vec3 uColorA;
uniform vec3 uColorB;
Update vColor and send it a mix of uColorA and uColorB according to noise:
void main()
{
    // ...
    vColor = mix(uColorA, uColorB, noise);
}
What’s really cool with using noise is that the color matches with the parts that get separated first.
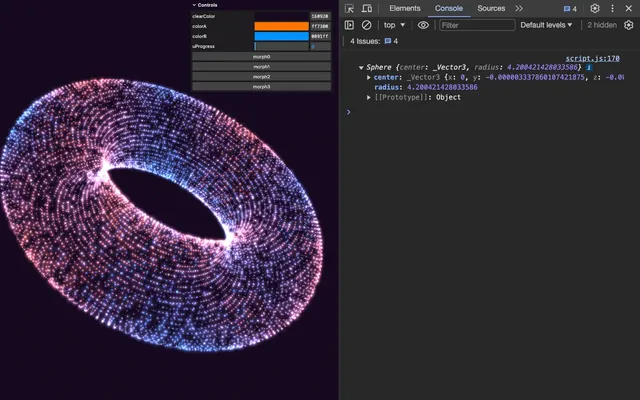
Frustum culling bug 01:25:35
If you morph into the text shape and move the camera sideways, at some point the whole object will disappear:
This is because of the frustum culling.
Frustum culling is a feature that we can find in most real time rendering solutions which prevents rendering objects that are not in the view to save on performance:
Three.js supports this feature.
In order to know if objects are in the view or not, Three.js calculates what we call a “bounding”. It’s a mathematical representation of the object based on the vertices. Imagine a sphere or a box surrounding your object. This makes the calculation much easier which is important since Three.js needs to test if objects are in the view or not on each frame.
In the case of Three.js, the bounding can have the shape of a box or a sphere. By default, Three.js will compute a sphere and you can find it on the geometry itself.
Try to console.log() the boundingSphere after creating the Points:
gltfLoader.load('./models.glb', (gltf) =>
{
    // ...

		// Points
    particles.points = new THREE.Points(particles.geometry, particles.material)
    scene.add(particles.points)
    console.log(particles.points.geometry.boundingSphere)

    // ...
})
We get null. Weird, but it’s actually for a good reason.
Three.js calculates the bounding only if needed. At the time of the console.log(), we haven’t rendered the object yet.
But on the first render of the object, Three.js will realise that it first needs to know the bounding of the object, will compute it, and then decide to render it or not if it’s in the view. On the next frame, Three.js will use the already computed bounding.
If we truly want to console.log() the bounding, we can achieve this by doing it on the next frame, after the initial render, using requestAnimationFrame:
gltfLoader.load('./models.glb', (gltf) =>
{
    // ...

		// Points
    particles.points = new THREE.Points(particles.geometry, particles.material)
    scene.add(particles.points)

    window.requestAnimationFrame(() =>
    {
        console.log(particles.points.geometry.boundingSphere)
    })

    // ...
})
Remove the console.log().
Great, unfortunately, that doesn’t fix our issue.
But now you understand what’s going on and why the particles disappear when we move the camera sideways.
Three.js has calculated the bounding sphere according to the initial shape, which was the torus. But the THREE.JS shape is much larger.
There are two options to fix that:
- Ask Three.js to recompute the bounding sphere
- Ask Three.js to ignore frustum culling
Unfortunately, the first one would be difficult to apply, because Three.js uses the position attribute to calculate the bounding which is, in our case, the origin shape (the one we are leaving).
So instead, let’s deactivate the frustum culling by setting frustumCulled to false on particles.points:
gltfLoader.load('./models.glb', (gltf) =>
{
    // ...

		// Points
    particles.points = new THREE.Points(particles.geometry, particles.material)
    particles.points.frustumCulled = false
    scene.add(particles.points)

    // ...
})
You might think that it’s bad for performance, but if your particles are the main component of your experience, they will always be visible, making the frustum culling unnecessary.
Going further 01:33:12
We are done with the lesson.
Feel free to go further. Here are suggestions:
- Refactor the part where we create
particles.positions. We kept it simple, but you can improve it. - Add a small movement to the particles at all times to add more life to the experience.
- Add your own models.
- Add more particles. I used a modest number of particles composing the shapes, but you can increase it by tenfold without performance issues.
- Add some particles everywhere because the only particles we have right now are the ones from the models.
- Add more tweaks to control the transition, especially for the
amplitudevariable which can drastically change the look and feel of the animation.